Showing posts with label Recipes. Show all posts

Wednesday, February 13, 2013

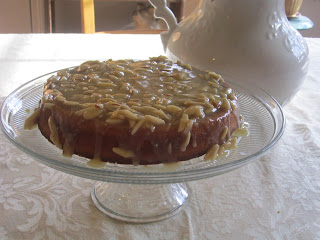
Nordic Tosca Cake


  This is a delicious cake. It is not overly sweet and would go perfect with a good cup of coffee.


I got this recipe from the Nordic Bakery Cookbook. What a superb book! You can purchase it by clicking on the link above!


Ingredients for cake:4 Eggs
3/4 C plus 2 tbsp Sugar
1 C of heavy cream
6 1/2 tbsp unsalted butter, melted and then cooled
2 tsp. vanilla extract
2 C all-purpose flour

Tosca Topping
5 tbsp unsalted butter
1/3 C sugar
1 tbsp brown sugar (the brown sugar is not part of the original recipe, I added it and it tasted great!)
3 tbsp heavy cream
3 tbsp all-purpose flour
3/4 C slivered almonds

Directions:
Preheat oven to 400 degrees

Mix eggs and sugar with electric mixer until foam like and almost white. This takes about 10 minutes

Add the cream, melted butter, and vanilla and fold in gently

In separate bowl, sift the baking powder and flour together and then fold into egg mixture

Pour mixture into prepared cake pan (I used a 9 in. cake pan, but I believe a springform pan would have been better)

Bake for 30-35 minutes (mine was done in 27 minutes)

While cake is baking, make topping. Put all ingredients in a small saucepan over low heat, stir to mix and bring gently to a boil.

Remove cake from pan and pour topping


Saturday, February 18, 2012

Asado de Puerco

This is a very easy dish and is a bit on the spicy side. So if jalapeños are tough for you to eat, you might want to use only 4 chiles instead of the 7.  This is an authentic Mexican dish that is popular in Northern Mexico. I used, as a base, a recipe from "The Authentic Mexican" cookbook, but I did tweak it a bit. I added the flour and peanut butter to thicken the sauce. The peanut butter gave it a smoother texture and removed some of the heat. Click here to buy the book. This came out just perfect! I made some home made flour tortillas to go with it!

Ingredients:

7 Medium dried New Mexico chiles, stemmed and seeded
3 garlic cloves, roughly chopped
1/2 an onion diced
1 tsp. dried oregano
1/4 tsp. cumin
2 tbsp. vegetable oil
1 lb. pork shoulder cut into 1 inch cubes
2 C water
1/2 tsp salt
1 tbsp. flour
4 tbsp. peanut butter

Directions:
1. Heat a cast iron pan over medium heat and place the chiles on the skillet. Be sure to lay them flat. Toast them on both sides by pressing down on them with the back side of some tongs. Do this for only about 2-3 minutes on each side. You will see them change colors. Then cover them with water and submerge them for about 30 minutes in the water, then drain and reserve 1 cup of the liquid.


2. Transfer the chiles, the reserved water, the garlic, the onions, the cumin and the oregano onto a blender. Blend until smooth.

3. Using the same pan, heat the oil and brown the pork cubes until they have just turned brown. About 8 minutes.

4. Add the puree in the blender to the pan and continue to cook until the sauce turns darker. Be sure to scrape the bottom of the pan to get all the pieces of the pork. Cook for a total time of 5 minutes or so.

5. Transfer the pork and puree mixture to a bigger pot and add 2 cups of water and salt. Bring heat to a low simmer.

6. Whisk in flour and peanut butter.  Simmer over medium heat for 1 hour add more salt if needed. Stir occasionally.


 I hope you enjoy this delicious dish!

Anna


Tuesday, February 14, 2012

Wheat Challah Bread - Recipes

Our family just enjoys Challah bread. My son loves to smell it! I have to keep them away from this bread with yells and scolds!  I usually use this recipe with normal flour, but decided to use wheat flour this time. With the weather being a little cold outside, the smell of freshly baked bread just makes you feel all warm inside. I can't wait for my husband and the kids to come home to the smell of this delicious bread. Here's the recipe.

Ingredients:
2 packages dry yeast (4 1/2 tsp)
2 Cups very warm water
1/4 C sugar
1/4 C oil
4 tsp salt
3 eggs slightly beaten
1/2 C honey
7 1/2 C wheat flour

Topping:
Egg Wash ( 1 egg with 1 Tbsp water mixed well)
Sesame seeds (optional)

In a large bowl mix the yeast and water well. Add sugar, oil, salt, and eggs. Mix well. Add roughly 3 cups of flour. Mix until there are no lumps. Then add honey and mix in. Let mixture rest for about 5 minutes. Gradually add the rest of the flour (4 1/2 cups).  Oil board and hands and knead for 10 minutes. Put dough back in bowl, cover and let rise for 1 1/2 hours or until doubled in size. Once the dough has doubled, punch down dough and cut in half. (This amount makes two rings). Cut your half into three pieces and roll out into long ropes. Braid the ropes by placing one rope in the middle and then making an X with the other two ropes on top of the middle rope.  Braid one side down and then the other side. Pinch the ends and tuck them under. Then brush on egg wash and sprinkle sesame seeds.


Bake for 25-30 minutes at 375 degrees.

If you hit the bread lightly with the back of a spoon,
and it sounds hollow, it's ready!

Blessings!


Monday, October 31, 2011

Cinnathumb Buns

Oh my! These were delicious and all 20 were gone in about an hour!

Ingredients:
1 C milk
1 egg lightly beaten
1/2 C sugar
1 tsp salt
1 tsp cinnamon
2 1/4 yeast (or one envelope)
4 C bread flour
5 Tbsp butter (room temperature)

Filling & Glazing
3 Tbsp butter (room temperature)
3 Tbsp sugar
1 egg lightly beaten

Sprinkles
3 Tbsp sugar
1/2 tsp cinnamon

Directions:
Heat the milk in a large saucepan, just until warm. Whisk the egg seperately with a little bit of the warm milk, then pour into the saucepan and whisk. Add the sugar, salt, cinnamon to the saucepan and mix well

In a separate bowl mix the flour and yeast together. Add a little of this flour mixture to the saucepan and whisk well to introduce lots of air into the dough. Continue to add the flour mixture. Once it gets to thick to use the whisk, use a wooden spoon. Finally add the butter and knead it into the dough with your hands until thoroughly incorporated. (The dough will be slippery)

Transfer the dough to a floured surface and knead for 10 minutes or until the dough is elastic and is no longer sticky. Add more flour if necessary. Return the dough to the bowl and cover with a clean kitchen towel. Let prove for 1 hour or until doubled in size.

After 1 hour, punch down the dough  and knead on a floured surface for a few minutes. Divide into four, then divide each piece into five again so you have a total of 20 pieces. Roll the pieces into balls and arrange on a baking sheet lined with baking parchment. Cover again and let prove for another 30 minutes.

Make the filling by mixing the butter and sugar together.

Pre-heat oven to 400F

After the 30 minutes, press your finger into the top of each bun to make a hole (I used my thumb!) and fill it with the filling. Brush the beaten egg on top of the buns. Bake for 10 minutes or until golden brown.

While still hot sprinkle the sugar and cinnamon generously over the buns. Eat warm!


Thursday, July 28, 2011

Burgers


This burger is super juicy and the caramelized onions are soooo worth the wait.

Before making your burgers, work on the caramelized onions first. Cut a large onion into rings and with a tablespoon of vegetable oil cook covered on med-low heat for about 30 to 40 minutes depending on texture preference. 

Ingredients:
1 lb ground beef
1/4 C bread crumbs
1/4 tsp salt
1/4 tsp Lawry's seasoning
some pepper
1 Egg
1 1/2 tsp of yellow mustard
1 1/2 tsp Worcester sauce

Directions:
Mix all ingredients with your hands and make into 4 patties. Grill.

For extra love always butter and grill the buns you are using on both sides. That adds so much extra flavor. Add lettuce, tomato, pickles, cheese (whatever you want). Top the burger with caramelized onions

** There is a tendency to smash the burgers during grilling so that the burger will cook more quickly. Don't. When you smash a cooking burger, you release too many of the juices and can end up with a dry burger.

Hope you enjoy!

Wednesday, July 27, 2011

Salsa Salsa!


We are so thankful to our Lord about the abundance of tomatoes this year. We planted about 6 tomato plants and all of them are just hunched over because of all the weight of carrying so many tomatoes. So needless to say I am trying my hardest not to waste any of them. I am going to try to make more and more salsas, and dishes that use a lot of tomatoes.


Here is a recipe of a basic red salsa that can be used on anything.

Ingredients:
* 5 to 6 tomatoes depending on size. This is your base. You always want to have more tomatoes than anything else
* 2 to 3 Jalapeño peppers. The more jalapeños you add the hotter the salsa will be. You want salsa to accentuate your food, not to make you tear up and clear your sinuses. A little bit of a runny nose is okay, but you do want to enjoy the food.
* 1 onion. You do not want too much of onion flavor so one will usually do
* 2 garlic cloves
* I added a small poblano pepper, it adds a smoky flavor to the salsa. It is not needed to make a good salsa
* 2 dashes of Salt 

Controlling Heat: Make sure you seed all the jalapeños before blending or mashing. You can do this before you boil or after. Do not rub or touch  your face after handling jalapeños. The oils will sting. If you prefer, you can wear gloves while handling them or wash your hands thoroughly afterwards.

Place all the ingredients in a large pot and boil. Make sure the water covers all the vegetables. Boil for about 10 minutes or until the skins on the tomatoes are falling off and the jalapeno peppers are an opaque green. Remove all the vegetables including the garlic from the water, and  place in a blender or remove the water using a colander and return the vegetables to the pot. This depends on the texture you prefer in a salsa. I like having chunks of tomato and jalapeno when I eat salsa, some prefer to have a more velvety texture to theirs. So if you prefer the velvety texture, place all the ingredients in the blender and blend until smooth, adding cilantro and salt to taste. This is where the art of making your own salsa comes in. Adjust the taste of your salsa by adding and removing ingredients. If you want a more textured salsa, just smash all the ingredients together with a potato masher or you can use a "molcajete" which is a mortar and pestle made out stone. Adding salt and cilantro to taste.

This salsa tastes so much better when it is served temperature hot.


I love love love to use salsa on over-easy eggs. The taste of the tomatoes, peppers and garlic just go splendidly with the yolk of the egg. Eating it with a warm flour tortilla is just heavenly!


Storage: Store any leftover salsa in an airtight container. For best taste always re-heat salsa in a skillet using a tiny bit of vegetable oil.

You can use this salsa on eggs, on sandwiches, on hotdogs as a relish, as a dip, to add taste to any meat dishes, and anything else you can think of. I even know of some people that add a little bit to their spaghetti sauces.

** Also salsas are a good way to control your sodium intake. Usually when you add salsa to things, you tend to use less salt because of the flavorful taste that salsa adds to food! Try it. Add salsa to your food instead of salt and notice that you don't really need to add any more salt to what you are eating. 

Hope you enjoy!

Tuesday, July 12, 2011

Mexican Monday - Carne Guisada

I know that this is Tuesday, but I didn't have time on Monday to post this. Sorry!

Carne guisada is almost a stew, but it is eaten more like a very juicy meat. Homemade flour tortillas are perfect for this meat because you can sop up all the yummy juices with them.

Ingredients:
1.5 pounds stew meat
1 Tbsp vegetable oil
2 cloves garlic roughly chopped
2 Tbsp flour
1 medium onion chopped
1 tomato roughly chopped
1/8 tsp cumin
1/8 tsp salt
1/4 tsp of Lawry's seasoning (or favorite seasoning)
pepper to taste
3 C of water
6 oz. tomato sauce

Directions:
Saute meat and garlic in vegetable oil on med-high heat in a dutch oven or large deep pan with cover. Saute for about 3 minutes and then add onions, tomato and flour. Saute until onion begins getting tender about 6 minutes. Keep scraping the flour from sides of oven/pan.  Add in all spices and seasoning and stir for another 2 minutes or so. Then add water. Keep stirring and scraping sides. Once the meat has simmered for about 20 minutes, add tomato sauce and stir. Cover and let simmer for another 40 minutes until sauce thickens. Stir occasionally.

** If sauce is too soupy add some more flour, if too thick add more water. **

You can top with cheese


We ate our carne guisada with some homemade gorditas! Frankly, there wasn't too much conversation going on.


Hope you enjoy!

Monday, June 20, 2011

For Left Over Spaghetti

If your family is anything like mine, we always end up with left over spaghetti. Here is a twist to left over spaghetti.

Ingredients
8 oz sliced mushrooms
2 Tbsp butter
1 Tbsp veg. oil
1/8 tsp salt
dash of pepper
5 oz baby spinach
3 oz of cream cheese
1/4 C Parmesan cheese
1/4 C Italian Shredded cheese mix
Left Over Spaghetti

Directions: Heat oil at med-heat and add mushrooms. Saute for a minute or so and add butter, salt and pepper. Saute mushrooms until they are beginning to soften, then add spinach. When the spinach begins to wilt, add cream cheese. Once cream cheese has melted, add both cheeses. Then add the left over spaghetti. The less spaghetti you add, the more sauce you will have.  Top with cheese.


ENJOY!!

Tuesday, June 14, 2011

Potato Pancakes

 Potatoes are so versatile! You can fry them, bake them, mash them, whip them and even make them into soup! Here is a great recipe when you have left over mashed potatoes.

Recipe: 2 Cups of your favorite mashed potatoes
            1/4 Cup flour
            1/4 Cup cream style corn
             1 Egg
             3 Tbsp shredded onion or green onion
             1 tsp parsley
             1/2 tsp salt
             1/2 tsp minced garlic
             1/8 tsp of pepper
             Vegetable oil to grill

Instructions: In a large bowl mix all the ingredients. On a skillet heat your vegetable oil (like you would a pancake). This recipe yields about 8 medium sized pancakes, I like to make mine smaller just so the kids will try it out. Cook on each side for 1 to 2 minutes or until golden brown.

If batter is to thick, you can add milk, if it is too runny you can add some flour.

The onion in the pancake is delicious, but may be a bit too strong for picky eaters. If you want to have your kids try this out, it may be best to leave out the onion and add some kernel corn to it instead.

Another substitute that goes deliciously well with this mixture is tuna. Just drain the tuna first and add. Potato and tuna is a wonderful mixture especially for lent.

I topped the pancakes with some canned soup! It was easy, it was cheap and it was yummy!!


Enjoy!!!

Thursday, June 9, 2011

American Mess Cake


 On Veteran's Day I wanted to make a special cake. I wanted the red, white and blue colors of our beautiful flag. I wanted to capture the majesty of the buildings found in Washington D.C. I wanted to encompass the very taste of freedom. Well it was a major fail. My cake looked anything, but majestic or beautiful. Although it was delicious!!!

The Story: I was in a rush! Getting the chicken marinated, the salads, the sides and all that good stuff. And the pressure I put on myself to make it extra special really didn't help. I baked the cake and didn't wait for it to cool. I made the strawberry sauce and didn't wait for that to cool. So I tried frosting my warm cake and ended up with a glaze and a cake that had absorbed all the runny strawberry sauce. I then, in my desperate attempt to make it look pretty, I added the blueberries around the cake and they just slid off the cake like slow rolling tears! Although it wasn't pretty to look at, the cake was gone in less than a day. Mind you we only had 2 adults, 1 kid and a toddler, and I only had ONE PIECE!

I dubbed the cake: THE AMERICAN MESS

Recipe for Cake: Plain white cake mix from a box

Recipe for Frosting: 2 C confectioners sugar
                              1/2 C butter
                              1 tsp vanilla extract
                              1 Tbsp of milk (add a little more if too thick)
Recipe for Strawberry Sauce:
                     1 pound of fresh strawberries (diced, with tops removed)
                     1/4 C of water (less if you want a thicker sauce)
                     1/2 sugar (more if you want a thicker sauce)
                      Boil until strawberries are soften (about 5 minutes) and then mash (keep some texture)
Instructions:
Take the cakes out of the oven and wait until cool enough to handle. Do not completely cool. I used one 9 in. spring form pan, and two 6in. pans for one box. I placed the largest cake on the bottom and slathered some strawberry sauce and put one of the smaller cakes on top of that. I cut off the top of that little cake and slathered a lot more strawberry sauce on top of that little cake. I then put the last little cake on top of that one. And instead of waiting for the cake to cool (I need to work on my patience), I began frosting the cake. Well the frosting just melted on top of the cake and made a type of glaze. Like the kind you find on doughnuts!!! It was so yummy. I covered the cake as well as I could. I tried garnishing with blueberries, but the blueberries wouldn't hold. So after I started crying because of all the mess, I added some more strawberry sauce on top, mostly the chunks of strawberry. When we cut the cake to eat it, we added some more strawberry on top of the slices!
** Make sure you have some king of depth to the cake stand or where you decide to frost the cake, the frosting will spill over if it is completely flat (see pictures)


Yummy chunks of strawberry. The frosting made a delicious glaze.


 This is what the cake looked like after it was "done". Notice the blueberries on top!

Notice all the gooey yumminess that has gathered at the bottom. Be careful!


              THE AMERICAN MESS

Friday, May 6, 2011

Apple Crisp

I had some apples that I was afraid would not last too much longer and I would have hated to have to thrown them away, or  give them to our chickens. So I looked up a recipe in a cook book that was given to me. I just love this cookbook! It's the Betty Crocker Cookbook, New Edition. I have used this cookbook for entrees and some sides.

Here is the recipe:

4 Medium tart cooking apples, sliced
3/4 Cup packed brown sugar
1/2 Cup all-purpose flour (self-rising flour can be used)
1/2 Cup quick cooking or old-fashioned oats
1/3 Cup butter or margarine, softened
3/4 Teaspoon ground cinnamon
3/4 Teaspoon of ground nutmeg

1. Heat oven to 375 degrees F. Grease bottom and sides of 8-inch square pan with shortening
2. Spread apples in pan. In medium bowl, stir remaining ingredients. Sprinkle over apples.
3. Bake for 30 minutes or until topping is golden brown and apples are tender when pierced with a fork

Options: Serve with ice cream!!!!

My Modifications - * I didn't have tart apples, I used what I had, which I think were gala apples. *I ran out of brown sugar half way through because my husband went cookie crazy and baked a lot, so I used plain white sugar instead. *I first coated the sliced apples with some sugar, cinnamon and nutmeg. Then I  placed them in the greased baked dish. * I doubled the crisp part of the recipe. I just love me some apple crisp crisp!

Hope you enjoy this recipe! Perfect for those cool days that sneek up on us sometimes!
                         

Monday, April 25, 2011

No Fail Pancakes

These pancakes are so yummy that you don't have to put any maple syrup on them! You can if you'd like, but they are fluffy and oh so sweet! I usually just put a sunny side up egg on top and eat it just like that! And sometimes the kids eat these without syrup!

Here is the recipe:
1 Cup all-purpose flour
2 teaspoons sugar
1 teaspoon brown sugar
3/4 tablespoon of cinnamon
1/2 tablespoon of vanilla extract
1/2 teaspoon salt
1/2 teaspoon baking powder
1/4 teaspoon baking soda
1 Cup of buttermilk (if you do not have buttermilk you can do 1 Cup of normal milk and add 1/2 tablespoon of vinegar, just let the mixture sit for about 5 minutes)
2 tablespoons unsalted butter, melted ( I didn't have butter - oops - so I substituted the butter for 1 tablespoon of vegetable oil!)
1 large egg

Get a medium bowl and whisk all dry ingredients. Then get a 2 cup measuring cup and add milk and butter or oil and mix. Add the milk mixture to dry ingredients and then add egg. Mix until just blended. Do not over mix the batter. Heat your skillet. While skillet is being heated you will start to notice your batter getting little air bubbles. That's just perfect! Brush your griddle with a non-stick spray or some vegetable oil and pour batter on griddle about 1/3 cup at a time. When surface of pancake starts to bubble, flip the pancake and cook until remaining side is browned. ENJOY!

Yields 7 5in. pancakes!

Wednesday, April 6, 2011

Olive Garden's Zuppa Toscana

I found this recipe in a book my dad gave me a long time ago. The book is called: Top Secret Restaurant Recipes by Todd Wilbur. I just love this soup! There were some different things that I substituted to save money and the soup was still deliciously fabulous. Instead of using heavy cream, I used half and half. I used Walmart brand chicken broth and I didn't use red pepper flakes, but a seasoning of garlic and herbs that I think has some kick to it that I found in my spice cabinet. I also added the garlic part, so if you want to go completely like the recipe at Olive Garden, then skip the garlic. But adding a bit of garlic to any dish isn't going to hurt anyone - well maybe dessert! Total price of everything was way cheaper than it would have been if we had gone out to Olive Garden. Super easy to make and super yummy!

 Ingredients:
2 3/4 Cups of Chicken Stock or Broth
1/4    Cup of heavy Cream
1       Medium russet potato
2       Cups of chopped kale
1/2    Pound spicy Italian sausage
1        Garlic clove (minced)
1/4    tsp salt
1/4    tsp crushed red pepper flakes

1. Combine the stock and cream in a saucepan over medium heat.
2. Slice the potato into 1/4-inch slices, then quarter the slices and add to the soup (I removed the peel, you can leave the peel if you would like an earthier taste)
3. Add the kale (it is best not to use the rib on the kale. A rough chop will do. The kale withers with the hot soup.
4. Saute the garlic for 1 minute and then add the sausage. Cook completely and then add to the soup.
5. Add the spices and let the soup simmer for about 2 hours. Stir occasionally.

Yield: 2 Servings or 4 Appetizers


Hope you enjoy. We loved it!

Tuesday, April 5, 2011

Twice Baked Potatoes w/ Kentucky Wild Chives

Everywhere, in the beautiful town of Kuttawa, there are chives growing wild. These little clusters of chives are sprinkled throughout the hills of Kentucky. So I wanted to cook something up using these yummy chives. I found a recipe in "Taste of Home: Mom's Best Made Easy." I tweaked this recipe quiet a bit, by adding mayo, regular mustard instead of Dijon, and replacing the green onions for the chives. I also didn't use bacon bits. I messed up one potato while I was shelling out the potato pulp so I just saved the rest that couldn't fit in and ate it as mashed potatoes. But this was a very yummy side that our family REALLY enjoyed!

Ingredients:

2 Baking Potatoes
1/8 Cup of Milk (more if you like a smoother texture)
4 TBSP of Butter or Margarine
1 TBSP of Yellow Mustard or a little less to taste
2 TBSP of Mayonaise
1/2 Cup of Shredded Cheddar (mild)
8 Sprigs of Chive chopped
Salt and Pepper to taste


Options: Add any left over meats like shrimp, bacon bits or steak tips. Add a dash of paprika to make these potatoes "deviled". You can also add a kick to this recipe by adding some Ranch dressing!


Instead of baking the potatoes in the oven to soften them up, to speed up the process you can microwave them. Just pierce the potato a couple of times with a fork, place them in a microwave proof plate, and set the microwave to 7-10 minutes, depending on the size of the potato and the power of your microwave. Once the potatoes have been cook, let them stand for about 5 minutes so they can cool off. Be careful, the plate is also very hot. Also make sure that the potatoes are soften all the way. I messed up on a larger potato because it didn't cook all the way and when I tried to scoop out the inside, the outer shell broke on me. 


Once the potato is cooled off, take a knife and cut a thin slice off the top of the potato. Discard. Get a spoon and then shell out the inside of the potato. Be careful not to break the outer skin. Try to get as close as you can to the skin, but not too close that it makes the outside flimsy. Place all of the inside of the potatoes in a medium bowl and mash with milk and butter. Salt and Pepper it to taste. Stir in mustard, mayonnaise, cheese and chives. Spoon into potato shells. Return the potatoes (now stuffed) to the microwave safe plate. Sprinkle extra cheese on top. Microwave, uncovered for 1-2 minutes or until cheese is melted.


Yield: 2 servings

It was so fun having Nathan go get the chives from outside. I have an endless supply of chives! I wonder what else I can cook with them?!

Friday, February 11, 2011

Irish Soda Bread - Recipe

I know that love is in the air with Valentine's Day just around the corner, but here is a recipe that I found for St. Patty's Day. It's called Irish Soda Bread and it is super easy to make. I made it this morning and had it with some butter and coffee. It is a very rustic looking bread and would be wonderful with thick stews, hearty soups or juicy meat dishes. It is perfect for sopping yummy juices left over from meats or gravies. Obviously, if you want to go Irish, this Irish soda bread would go wonderfully with a corned beef.


Here is the recipe:
1 1/3 Cups of whole milk
1/3    Cup of apple-cider vinegar
3       Cups of all-purpose flour, plus more for surface and dusting
2 1/2  teaspoons coarse salt. (If you are using Kosher salt, use only 2 tsps.
1        teaspoon of baking powder
1        teaspoon of baking soda
4        Tablespoons of cold unsalted butter, cut into small pieces
1        Cup of Quaker oats or bran
1        Cup of raisins
          Butter for serving

1. Preaheat oven to 350. Line a baking sheet with parchment. Mix milk and vinegar in a small bowl, and let stand until thickened, about 5 minutes.
2. Mix flour, salt, baking powder, and baking soda in a large bowl. Cut in butter with knives or pastry cutter. Until mixture resemble very coarse meal. Try not to use your hands. Add in the oats and raisins, stir to distribute.
3. Pour milk mixture into flour mixture. Stir dough together. The dough will be very sticky Do not over stir. Turn dough unto floured surface. Pat and press dough into a round dome-shaped loaf.
4. Light dust top of loaf with flour. With a knife cut an X into the top. Make sure it is about 1 inch deep. My X didn't show on my bread because I didn't make the cut deep enough.
5. Bake for about 1 hour and 10 minutes or until golden brown. Rotate halfway through. Check your bread in about an hour. The bread is ready when you can insert a fork and it comes out clean. My bread was ready in about an hour.

I am going to use this bread as a bread bowl and put some kind of potato chowder or brocolli and cheese soup. I will post pictures when I do it!